Hello, hello.
It's been a couple of weeks since I posted something new, but we've been busy. The house is basically done, so now we are on the worst kind of countdown: we know the house is ready, we could be living in it, but we still have to wait for the closing date. It's painful.
We ended up hiring an independent inspector to come to the house and provide us with an experienced pair of eyes before our walkthrough. He was recommended by a family member who works with him and he did my mother-in-law inspection a month or so back. We met him on Friday 5/26.
We are very happy we hired someone to complete this step with us. Andrew was very knowledgeable and thorough on his inspection, pointing out not only concerns, but also things Ryan Homes has done right. Chad and I took over the blue tape and marked every little mark on the walls and floors we could find. Most of what we noticed was cosmetic: some marks on the wall, a little paint on the carpet, a few dented hardwood boards, scratched door knobs... that kind of stuff. I suggest you guys look at every single inch of your home and don't be afraid to run out of tape. As Andrew said, ask for anything you're not happy with and go from there. RH won't fix anything you don't point out, so might as well ask for it.
He did find a couple of major things:
- Our dishwasher is not functioning properly. Water is pooling at the bottom and not draining properly during the cycle.
- Our furnace is not working. Gas is not being fed to it, so we have no heater in the house.
- There are a few shingles that were cut and glued instead of replaced. He said that's not as big as a deal, but it won't last as longer and there's no reason why they couldn't have replaced it.
- Where our dormers meet the roof, there is a gap that will allow critters to enter. He wants RH to board it.
- In that same spot, the siding should go under the board to allow for water flow. The siding is over that, so water may get behind the siding.
- The exterior trim paint is very sloppy. There are brush marks, missing spots, and even a hand print. He wants RH to redo it.
We looked at all cabinets, outlets, faucets, appliances, baseboard, trims, etc.
We have our official walk through in a couple of hours, so I'll make sure to add anything that has been missed in this post.
See you all later :)

Showing posts with label new home. Show all posts
Showing posts with label new home. Show all posts
Tuesday, May 30, 2017
Saturday, May 6, 2017
Week 12 - Closing Date!
We're in the home stretch now! We received our settlement date: final walk through 5/30 and settlement on 6/2! We are thankful to Ryan Homes for accommodating our dates--they actually had us settling that last week of May, but we wanted a June date so we could pay our first mortgage in August and have one month of "free" rent.
This process went by so quickly. I can't believe we are less than a month away from owning our first home. No more throwing money away in rent!
We stopped by today and took some pictures. We were also told we should have our dormers installed next week. I'll throw a freaking party when I see those dormers up :P

Carpet in the basement

First floor - faucet was installed and we have water

Little peak on our hardwood floor

Plumbing fixtures were also installed. No peed in there, we checked

Driveway, sidewalk, apron... just missing landscaping

Back of the house was filled, too. We are making peace with the idea of a sloped backyard
Saturday, April 29, 2017
Week 11 Updates
Here's our updates for this week. We are so ready to enjoy this awesome deck! We also met the neighbors who live right behind us (our decks face each other). I believe they rent, though, so I guess they won't be around for too long? They seemed nice, nonetheless.

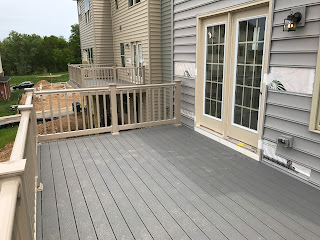


Back of the house. Wish the backyard was flat :|

Can't wait to grill!

Granite and sink were installed

Garage door and concrete pathway
Sunday, April 16, 2017
DIY: Rustic X End Table
Hello everyone!
Even before the hubby and I signed on our house, I've been collecting Pinterest Pins on different subjects: decoration, organization, and yes, DIY projects. Watching Fixer Upper and other HGTV shows made matters worse, so now I have something to say: Hi. My name is Viviane and I'm a Pinterestoholic. That's it, I'm addicted. I've got a fever, but more cowbell won't do it for me. I need to build something!
A couple of months back I bought a Kreg Jig. I had never used one and figured that would be the one tool I should have handy when building anything. Finally, I was able to give it a try and that thing is magic!
"But what did you build, Vivi?" Alright, alright. I got excited with the background story part of this post. Anyway... I found Ana White's Rustic X End Table plan one day and decided I'd recruit Chad to help me building it. I love the farmhouse style of this table and it looked somewhat simple. Below is our experience building it. Enjoy it!


Material list*:
2 - 2x4 @ 8 feet long
1 - 1x12 @ 3 feet long
2 - 2x2 @ 8 feet long
2 - 2x6 @ 8 feet long
Corner bracket hardware
Decorative bolts
2 1/2" and 1 1/4" PH screws
Cut list*:
a) 8 - 2X4 @ 22 1/2"
b) 4 - 2X2 @ 16"
c) 2 - 1X12 @ 16"
d) 2 - 2X2 @ 26 1/2" (long point to short point, ends are parallel, 50 degrees off square)
e) 4 - 2x2 @ 13 1/4" (longest edge, one end cut at 50 degrees off square, other end cut at 10 degrees off square)
f) 5 - 2x6 @ 27"
*both taken from Ana's site
First, we built the frame of the end table by attaching the 2x4s (a) boards in a shape similar to a squared letter "A" and then connecting both "As" with the 2x2s (b). During this step, make sure you're checking the square and level after each attachment.


We used the Kreg Jig to attach the boards. For the 2x4s, we drilled holes A and C and used 2 1/2" PH screws to hold them in place.


Next step is to build the top of the table. Just like the bottom tray, we assembled the 2x6s (f) and built the whole top piece before attaching it to the frame. We drilled three sets of pocket holes with the Kreg Jig (A and C).


Even before the hubby and I signed on our house, I've been collecting Pinterest Pins on different subjects: decoration, organization, and yes, DIY projects. Watching Fixer Upper and other HGTV shows made matters worse, so now I have something to say: Hi. My name is Viviane and I'm a Pinterestoholic. That's it, I'm addicted. I've got a fever, but more cowbell won't do it for me. I need to build something!
A couple of months back I bought a Kreg Jig. I had never used one and figured that would be the one tool I should have handy when building anything. Finally, I was able to give it a try and that thing is magic!
"But what did you build, Vivi?" Alright, alright. I got excited with the background story part of this post. Anyway... I found Ana White's Rustic X End Table plan one day and decided I'd recruit Chad to help me building it. I love the farmhouse style of this table and it looked somewhat simple. Below is our experience building it. Enjoy it!


Material list*:
2 - 2x4 @ 8 feet long
1 - 1x12 @ 3 feet long
2 - 2x2 @ 8 feet long
2 - 2x6 @ 8 feet long
Corner bracket hardware
Decorative bolts
2 1/2" and 1 1/4" PH screws
Cut list*:
a) 8 - 2X4 @ 22 1/2"
b) 4 - 2X2 @ 16"
c) 2 - 1X12 @ 16"
d) 2 - 2X2 @ 26 1/2" (long point to short point, ends are parallel, 50 degrees off square)
e) 4 - 2x2 @ 13 1/4" (longest edge, one end cut at 50 degrees off square, other end cut at 10 degrees off square)
f) 5 - 2x6 @ 27"
*both taken from Ana's site
First, we built the frame of the end table by attaching the 2x4s (a) boards in a shape similar to a squared letter "A" and then connecting both "As" with the 2x2s (b). During this step, make sure you're checking the square and level after each attachment.


Note the squared "A" shape. Distance from the top of the bottom board to the floor is 2"
We used the Kreg Jig to attach the boards. For the 2x4s, we drilled holes A and C and used 2 1/2" PH screws to hold them in place.


Only top and bottom boards need holes drilled on both ends. You will use both to attach the side boards
For the 2x2s, we drilled B and C holes and also used 2 1/2" PH screws.


Drill holes on both ends of all 4 2x2s


Attach all 2x2s to one side of the table, then attach the second side using the pre-drilled Kreg Jig holes

Stress test!
At the end of this step, you will have the frame of your table. Feeling accomplished, we took a break to enjoy the beautiful weather and wonderful view:

But back to work!
The next step was to add the bottom shelf of the table. For that, attach both 1x12s (c) to create a tray. Again, we used the Kreg Jig and drilled three sets of holes A and B (right, center, and left) on the board. One of the boards will have holes on both sides to attach to the table and to the other 1x12:


We used the 1 1/4" PH screws for this step
In this step, it is likely that your tray won't fit perfect into the bottom part of the table. We tried using some force to make it fit, but we were afraid we would damage the board, so Chad used a sander to smooth out the end of the boards (the 16" end, that is). After some trial and error, it fit perfectly.


Finished step. There's a little gap on the bottom left corner, but we are going to put some wood filler later
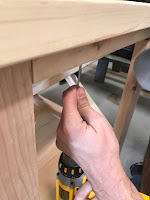
The next step is to cut and assemble the X on the side of the table. We were a little anxious about this step, but it was surprisingly easy. One part of the X will be a longer piece of 2x2 (d) and the other part will be two smaller cuts of 2x2 (e). As specified on the cut list, both ends of (d) will be at 50 degrees off square, while for the smaller pieces (e), the end that connect to the table will be at 50 degrees square and the end that crosses the longer piece will be at 10 degrees off square. We used a miter saw to measure and cut the boards. As usual, MEASURE TWICE AND CUT ONLY ONCE. There were a few trips back to the saw to adjust the smaller pieces to make sure it was a perfect fit, but we took our time and all turned out fine.


Here are some pictures of the process. We attached the two long sides first and used a 2 1/2" PH screw to attach them to the 2x4. Make sure to place the screw at the widest part of the corner of the table so the screw doesn't pierce through the wood. The smaller piece piece connects to longer piece with a 1 1/4" PH screw and a pocket hole done with the Kreg Jig.


One side complete and step finished
Next step is to build the top of the table. Just like the bottom tray, we assembled the 2x6s (f) and built the whole top piece before attaching it to the frame. We drilled three sets of pocket holes with the Kreg Jig (A and C).


We attached the top to the table from the underside, using 2 1/2 PH screws. We used two screws for each side.


TA-DA! The table assembly is completed! To finish up, we sanded the whole thing using first 150 sand paper and finishing up with 220 sand paper. To prep for staining, we used Minwax Pre-Stain Wood Conditioner (water based) and stained with two coats of Dark Walnut Stain + Poly from Varathane. We thought it was going to look darker and maybe we didn't mix the can very well, but honestly, we do love the color. A nice addition was the L bracket we placed on the 4 corners of the table. We bought a 4" pack from Home Depot. It was silver, but we used Rust-Oleum Oil Rubbed Bronze spray paint to get the color we wanted.
This wasn't a very difficult project and we are planning on building the coffee table and the console table to complete the set. I hope you enjoyed it!

Tuesday, April 11, 2017
More Drywall and Some Siding!
Quick stop today. They are finishing up taping and muddying the drywall and I was pleasantly surprised to see we have some siding on the back of the house. We love the gray color! We couldn't choose, but we were happy not to get stuck with a tan house.


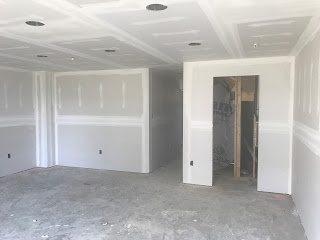


Kitchen and sunroom

Living room

Hallway seen from master bedroom

Basement

Garage

Siding on the back of the house
Tuesday, April 4, 2017
Pre-Drywall Meeting
Hello!
We had our pre-drywall meeting today. Our PM tried to reschedule it to this Thursday since they haven't started insulation on our house yet, but our inspector said he actually would prefer to see the house without it and make sure nothing major would be behind any insulation. So that's what we did.
Frank was very nice to us, as usual. We walked the house and he explained to us what we were seeing. We had a few questions about the house, but we didn't know exactly what to look for. Having the inspector with us was very important as he did catch a couple of things we would have never thought of (a crack on the window frame, a disconnected HVAC duct, a couple of cables not nailed to the walls). Nothing too major, according to him, but glad he caught it. He will be sending us a report by tomorrow.
Now, the most important thing: the closing date.
According to Frank, they are having some issues with the electric company coming over, installing the meter, and starting service in the homes. Apparently, demand is way too high and they are having issues keeping up with it all. Frank hopes and is somewhat confident that they will have it all taken care of by first week of May. If that's the case, we should have our walk on 5/27 and close 5/31. We had talked to RH about closing in June, so I'll remind our SR of it and maybe we can schedule it for a couple of days later-- 6/2. That would work perfectly for us :)
We asked Frank for a few favors, but unfortunately he couldn't help us. They were:
- leave the granite lip out for backsplash
- install our fans
- install our cabinet knobs (we bought oil bronze ones). This he may be able to help after the house passes the QA inspection.
This is it! We are so excited and can't wait to move! :D
Monday, April 3, 2017
Appraisal
We received our appraisal back today and good news: OUR APPRAISAL CAME BACK ABOVE SALES PRICE! That's an instant $1483 equity for us :)
We have our pre-drywall tomorrow. I'll be back with a longer post after that.
We have our pre-drywall tomorrow. I'll be back with a longer post after that.
Wednesday, March 29, 2017
Pre-drywall Meeting Scheduled
Our pre-drywall meeting has been scheduled for this Tuesday, 4/4. So exciting!
We didn't know if we should have an independent inspector with us or not, but after asking a few people, we decided to go for it. We are not sure what to look for, so having that (experienced) extra set of eyes will definitely be helpful. Very worth it the fee. We will pay our inspector $300.
On a side note about our dormers issue, PM said they will be installing the dormers late April as he needs the framers to come around with a crane and we are past that framing stage. We are ok with it, as long as it is installed properly and before we move. Just a heads up for those following our blog in case they might wonder where the dormers are :)
Monday, March 27, 2017
Issue Resolution
This afternoon Chad and I received a call from Sam with a resolution on our dormers issue. Ryan Homes will honor what they represented to us and we will be getting our cute dormers. Woohoo!
I must say that we are very satisfied with how they handled the issue. Yes, it was stressful and yes, we were upset, but RH, well-represented by Sam, took ownership of the mistake and gave us a resolution on our issue in one business day. We weren't looking for anything more than what was promised to us and we got it. So leaving this one behind and moving on with enjoying the exciting process that is building a new home. Oh, and Frank stated that the shingles will be removed so the dormers are installed properly and that we shouldn't see a delay because of this.
We will, of course, be there later his week to see any progress in person :)
Saturday, March 25, 2017
Construction Update - Roof / Plumbing and a Bump in the Road
Hi ya'll,
We received an email from our PM this Friday letting us know that framing was complete, shingles were installed, and plumbing rough-ins were done. As soon as we saw the picture, we raised the concern that our dormers had not been installed and asked if they come after shingles. And that's when shit hit the fan.
Frank said that no, dormers are installed before shingles, but that double checking our selections he could see that dormers were not an option in our home. Say what?! That is not what the SR sold us and definitely not what was on the contract we signed.

He said it was possible that the dormers are not offered in the community. Say what (2)?! If dormers are not available, then why would it be in the picture above? I do understand that he only follows the selections sheet given to him, so I thanked him for his insight and turned my attention to the Sales team.
Immediately I sent Sam and Shannon an email asking for clarification on the issue and received a response back a few minutes later stating that they were "just realizing that the home does not have the dormers on certain elevations" and that they "have passed this on to management."
Since we stop by the house every weekend to see progress, we decide to wait for Sam to discuss this on person. She did say that she was not aware that the community wouldn't have dormers and did admit that she represented this information to us. She also said she will fight to get us what we want, but that there is a possibility that the developers will not allow the dormers and if so, there would be nothing they can do about it. And that's the second time shit hit the fan.
We responded that we did not agree with this "solution." We said we would rather have the dormers, but if that was not possible, then Ryan Homes better think of ways to make it up to us. I might have used the word bullshit, but hey, who wouldn't? Not sure if she was a little surprised by this, but despite of what she says, we are the ones who need to watch for our best interests.
I even told her we didn't want to point fingers or be dicks to her, but now it is a big disappointment. We've been proudly showing the house around to family, friends, and even strangers, and we will end up not getting what we were promised. Every time we look at our home, we will be upset we are not seeing what we really liked. And some may think it's stupid, but when you were spending this kind of money and signing your life away, you do NOT want to have this type of stress.
The quick meeting ended with her saying she would get back to us once she heard from management. She mentioned something about extra closing help to make it up to it, but nothing was promised yet. We look forward to see how attentive Ryan Homes' customer service is after they made a sale. I will update with a resolution once we have one.
On a side note, we grabbed a couple of hard hats and walked in the house. Here are some pics:

Loving the bay window

Can't wait to see the deck

HVAC and hot water systems

HVAC again

Main floor, measurements for our island and kitchen cabinets / appliances

Master bathroom tub :)
Subscribe to:
Posts (Atom)